Wo war das gleich noch? - Where was it again?
Oft sind es Kleinigkeiten, nach denen man bei Hubzilla sucht. Oder man erinnert sich an Dinge, die man an anderer Stelle (mit einem anderen Kanal oder auf einem anderen Hub) schon einmal eingerichtet hatte, einfach nicht mehr. Wo war das gleich noch? Wie ging das?
Hier entsteht eine wachsende FAQ zu genau solchen Problemchen. Den Anfang (und der Auslöser für diesen Info-Artikel) macht die Kanalauswahl im Hauptmenü.
It’s often the little things you’re looking for on Hubzilla. Or you simply don’t remember things that you have already set up elsewhere (with a different channel or on a different hub). Where was it again? How did that work?
Here is a growing FAQ on exactly such problems. It starts with the channel selection in the main menu (and the trigger for this info article).
Kanalauswahl - Channel selection
F: Wer über mehrere Kanäle verfügt, der weiß es zu schätzen, zwischen den Kanälen einfach direkt im Hauptmenü (i.d.R. oben links das Kanal-Profilbild) umzuschalten. Aber diese Funktion muss man erst aktivieren. Wie ging das jetzt nochmal?
A: Die Funktion erreicht man über die Einstellungen des Kanal-Managers (nicht verwechseln mit den Kanal-Einstellungen). Dazu wählt man im Hauptmenü den Menüpunkt Kanäle aus und klickt dann auf das kleine Zahnrad, welches neben dem Text “Kanal Manager” am Hauptmenü erscheint.
Dort gibt es aktuell nur eine EInstellung, nämlich genau diejenige, die wir gesucht haben:
“Kanal-Auswahl in der Navigationsleiste - Ermöglicht den direkten Wechsel zu anderen Kanälen über das Navigationsmenü”
Hier den Schalter einschalten, auf “Absenden” klicken… und schon werden alle Kanäle im Hauptmenü aufgelistet, so dass man schnell und ohne Umwege zwischen ihnen wechseln kann.
Man erreicht die Einstellungen auch direkt auch über diese URL: <hub>/settings/manage/
Q: If you have several channels, you will appreciate being able to switch between the channels directly in the main menu (usually the channel profile screen at the top left). But you have to activate this function first. How does that work again?
A: The function can be accessed via the channel manager settings (not to be confused with the channel settings). To do this, select the Channels menu item in the main menu and then click on the small cogwheel that appears next to the text ‘Channel Manager’ in the main menu.
There is currently only one setting there, exactly the one we were looking for:
‘Navigation Channel Select - Change channels directly from within the navigation dropdown menu’
Switch on the switch here, click on ‘Submit’… and all channels are listed in the main menu so that you can switch between them quickly and directly.
You can also access the settings directly via this URL: <hub>/settings/manage/
Das kleine, unsichtbare weiße Dreieck (Nutzer-Menü) - The small, invisible white triangle (user menu)
F: Was kann ich mit Nutzer, der in einem Stream auftaucht tun? (Die Frage nach dem “kleinen, unsichtbaren weißen Dreieck”.)
A: Bei vielen anderen Fediverse-Diensten, kann man in einem Beitrag eines anderen Nutzers diesen z.B. als Kontakt hinzufügen (folgen) oder ihn ggf. entfernen, ihn blockieren etc. Dies geschieht alles aus einem Menü, das auch das “boosten” etc. anbietet.
Bei Hubzilla dient das Beitrags-Menü (unten rechts ⋮) der Interaktion mit dem Beitrag an sich, nicht aber der Interaktion mit dem Beitrags-Ersteller. Dafür ist das Nutzer-Menü zuständig, das sich hinter dem Profilbild (Avatarbild) verbirgt. Fährt man mit dem Mauszeiger über dieses Bild, erscheint ein kleines Dreieck, welches signalisiert, dass hier auch ein Menü vorhanden ist. Klickt man nun auf das Bild, öffnet sich das Nutzer-Menü. Ich nenne es, weil es so unauffällig ist und man es erst bei “mouse-over” sieht, das “kleine, unsichtbare weiße Dreieck”.
Handelt es sich um einen vorhanden Kontakt, also einen Kanal, mit welchem man bereits verbunden ist, kann man sich mit diesem Menü das Profil des Kontakts ansehen, sich dessen kürzliche Aktivitäten anzeigen lassen, die Verbindung bearbeiten oder den Kontakt blockieren.
Handelt es sich um einen Kanal, mit dem man noch nicht verbunden ist, kann man sich mit dem Menü das Profil des Nutzers anschauen, sich mit ihm verbinden oder ihn vollständig blockieren (Superblock).
Q: What can I do with a user who appears in a stream? (The question about the ‘small, invisible white triangle’).
A: With many other Fediverse services, you can, for example, add (follow) another user as a contact or remove them, block them, etc. in a post. This is all done from a menu that also offers ‘boosting’ etc.
In Hubzilla, the post menu (bottom right ⋮) is used for interacting with the post itself, but not for interacting with the post creator. The user menu, which is hidden behind the profile picture (avatar picture), is responsible for this. If you move the mouse pointer over this picture, a small triangle appears, signalling that a menu is also available here. If you now click on the picture, the user menu opens. I call it the ‘small, invisible white triangle’ because it is so inconspicuous and you only see it when you mouse over it.
If it is an existing contact, i.e. a channel that you are already connected to, you can use this menu to view the contact’s profile, view their recent activities, edit the connection or block the contact. If it is a channel that you are not yet connected to, you can use the menu to view the user’s profile, connect to them or block them completely (superblock).
Das Farbschema des Kanals ändern - Change the colour scheme of the channel
F: Wie kann ich das Farbschema meines Kanals verändern?
A: Zum Verändern des Farbschemas, ruft man im Hauptmenü (oben links beim Profilbild) Einstellungen -> Anzeige-Einstellungen (<hub>/settings/display) auf.
Bei einem neuen, unveränderten Kanal ist es im Tab “Benutzerdefinierte Design-Einstellungen” lediglich möglich, das Theme per Default auf dunkles oder helles Theme zu stellen, die Navigationsleiste schmal oder größer darstellen zu lassen, sowie die Größe für den Inhaltsbereich und die Standard-Schriftgröße festzulegen.
Und es gibt einen weiteren Schalter: “Erweiterte Einstellungen anzeigen”. Und mit diesem sind dann detailliertere Einstellungen möglich.
Man muss den Schalter einschalten und auf den Button “Absenden” klicken. Bei nächsten Aufruf dieser Einstellungen findet man nun auch Farbeinstellungen, Einstellungen zu Eckenradien und einiges mehr.
Über das Feld “Primary theme color” stellt man die Grundfarbe für das gesamte Theme ein. Zusammen damit, aber auch unabhängig davon, kann man in dem Formular aber auch die Farben für viele verschiedene Elemente festlegen.
Q: How can I change the colour scheme of my channel?
A: To change the colour scheme, go to Settings -> Display settings(<hub>/settings/display) in the main menu (top left of the profile picture).
For a new, unchanged channel, in the ‘Custom Theme Settings’ tab it is only possible to set the theme to dark or light by default, to make the navigation bar smaller or larger, and to set the size for the content area and the default font size.
And there is another button: ‘Show advanced settings’. This allows you to make more detailed settings.
You have to switch on the switch and click on the ‘Submit’ button. The next time you call up these settings, you will also find colour settings, settings for corner radii and much more.
The ‘Primary theme color’ field is used to set the basic colour for the entire theme. Together with this, but also independently of it, you can also set the colours for many different elements in the form.
Beschränkte Bilder in Beiträgen sehen - View restricted images in posts: OCAP
F: Weshalb werden mir bestimmte Bilder in Beiträgen nicht angezeigt? Weshalb können andere Bilder in meinen Beiträgen sehen, obwohl ich diese in der Sichtbarkeit eingeschränkt habe?
A: Werden Bilder mit der Berechtigung “öffentlich” in Beiträge eingefügt, so kann jeder diese Bilder sehen.
Aber was ist mit Bildern (oder Medien im Allgemeinen), die in den Dateien (Cloud) Beschränkungen unterliegen, für die also nur bestimmte Nutzer die Berechtigung zum Anschauen haben? Das kann ja auch aufgrund der Kanalrolle automatisch so passieren, wenn man ein Bild unmittelbar hochlädt und die Rolle von sich aus für Medien z.B. nur “Freunden” die Berechtigung erteilt.
Sieht nun ein Nutzer den Beitrag oder Thread, oder nimmt er (z.B. per Kommentar) an dem Thread teil, so kann er das Bild unter Umständen (wenn er nicht zu den Berechtigten gehört) auch nicht sehen.
Trotzdem ist es möglich, den Beitrag mitsamt angezeigtem Bild zu sehen (selbst wenn das Bild in einem beschränkten Ordner gespeichert oder an sich in der Sichtbarkeit eingeschränkt ist). Dafür muss der Nutzer in seinem Kanal die Option “Enable OCAP access” einschalten. Damit wird das Recht auf Zugang zu verlinkten privaten Medien eingeräumt. OCAP steht für Object-capability model.
Die Option findet man im Hauptmenü (Avatarbild des eigenen Kanals) unter “Privacy Einstellungen”.
Achtung: Wer Bilder (oder andere Medien) in seine Beiträge einfügt, muss sich darüber im Klaren sein, dass diese jedem (der OCAP bei seinem Kanal aktiviert hat), der die Berechtigung hat, den Beitrag zu sehen, angezeigt werden, auch dann, wenn man das Bild an sich mit Berechtigungseinschränkungen versehen hat.

Q: Why am I not shown certain images in posts? Why can others see other images in my posts even though I have restricted their visibility?
A: If images are inserted into posts with the ‘public’ permission, anyone can see them.
But what about images (or media in general) that are subject to restrictions in the files (cloud), i.e. only certain users have permission to view them? This can also happen automatically due to the channel role if you upload an image directly and the role itself only grants permission to view the media to ‘friends’, for example.
If a user now sees the post or thread, or participates in the thread (e.g. by commenting), they may not be able to see the image either (if they are not one of the authorised users).
Nevertheless, it is possible to see the post with the displayed image (even if the image is stored in a restricted folder or its visibility is restricted). To do this, the user must enable the ‘Enable OCAP access’ option in their channel. This grants the right to access linked private media. OCAP stands for Object-capability model.
The option can be found in the main menu (avatar picture of your own channel) under ‘Privacy Settings’.
Attention: If you insert images (or other media) into your posts, you must be aware that these will be displayed to anyone (who has activated OCAP on their channel) who has permission to view the post, even if you have set permission restrictions on the image itself.
Sortierung der Artikel nach Erstellungsdatum - Sorting articles by creation date
F: Wie lässt sich die Sortierung der Beiträge in der Artkel-App nach dem Datum der Erstellung erreichen?
A: Artikel werden in der Gesamtübersicht, aber auch in den Kategorie-Übersichten immer chronologisch nach der letzten Änderung sortiert dargestellt. Das kann ungünstig sein. Wenn man z.B. an einem älteren Artikel eine kleine Änderung vollzieht, landet der Artikel, obwohl er alt ist, ganz vorne in der Liste.
Eine Möglichkeit, das zu ändern, ist das Umstellen auf die Sortierung nach Erstellungsdatum. Dazu muss man mit Admin-Rechten die Datei addon/articles/Mod_Articles.php anpassen.
In Zeile 209 muss man aus
$items = conv_sort($items, 'updated');
durch Ändern des Wortes updated die Zeile
$items = conv_sort($items, 'created');
machen.
Nun werden Artikel chronologisch nach dem Erstellungsdatum sortiert aufgelistet.
Danke an Chris für den Tipp!
Q: How can I sort the posts in the article app by date of creation?
A: Articles are always sorted chronologically according to the last change in the overview and in the category overviews. This can be inconvenient. For example, if you make a small change to an older article, the article will appear at the top of the list even though it is old.
One way to change this is to switch to sorting by creation date. To do this, you need admin rights to edit the file addon/articles/Mod_Articles.php.
In line 209, you need to change
$items = conv_sort($items, “updated”);
by changing the word updatedto
$items = conv_sort($items, “created”);
.
Now articles are listed chronologically according to their creation date.
Thanks to Chris for the tip!
Den Kommentareditor breiter machen - Make the comment editor wider
F: Der neue Kommentareditor als Overlay wird sehr schmal dargestellt. Die Breite lässt sich auch nicht ändern. Wie kann ich die Breite erhöhen?
A: Es gibt eine tolle Lösung, die Chris im Support-Forum veröffentlicht hat:
Voraussetzung ist, dass der Kanal die Erlaubnis hat, Code auszuführen. Das muss der Admin des Hubs freischalten.
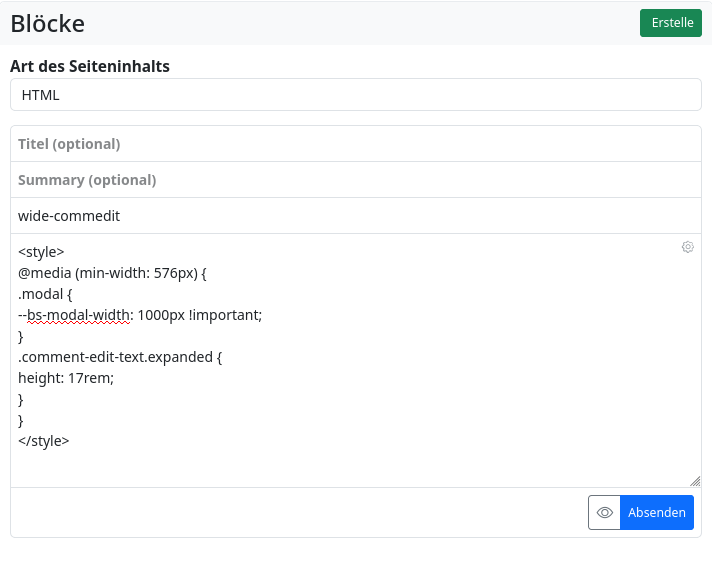
Man erstellt dann mit der App “Webseiten” einen HTML-Block mit folgendem Inhalt:
<style>
@media (min-width: 576px) {
.modal {
--bs-modal-width: 1000px !important;
}
.comment-edit-text.expanded {
height: 17rem;
}
}
</style>
Diesen Block (ITEM) fügt man nun mit dem PDL-Editor im MODUL “network” an beliebiger Stelle in den Inhaltsbereich ein.
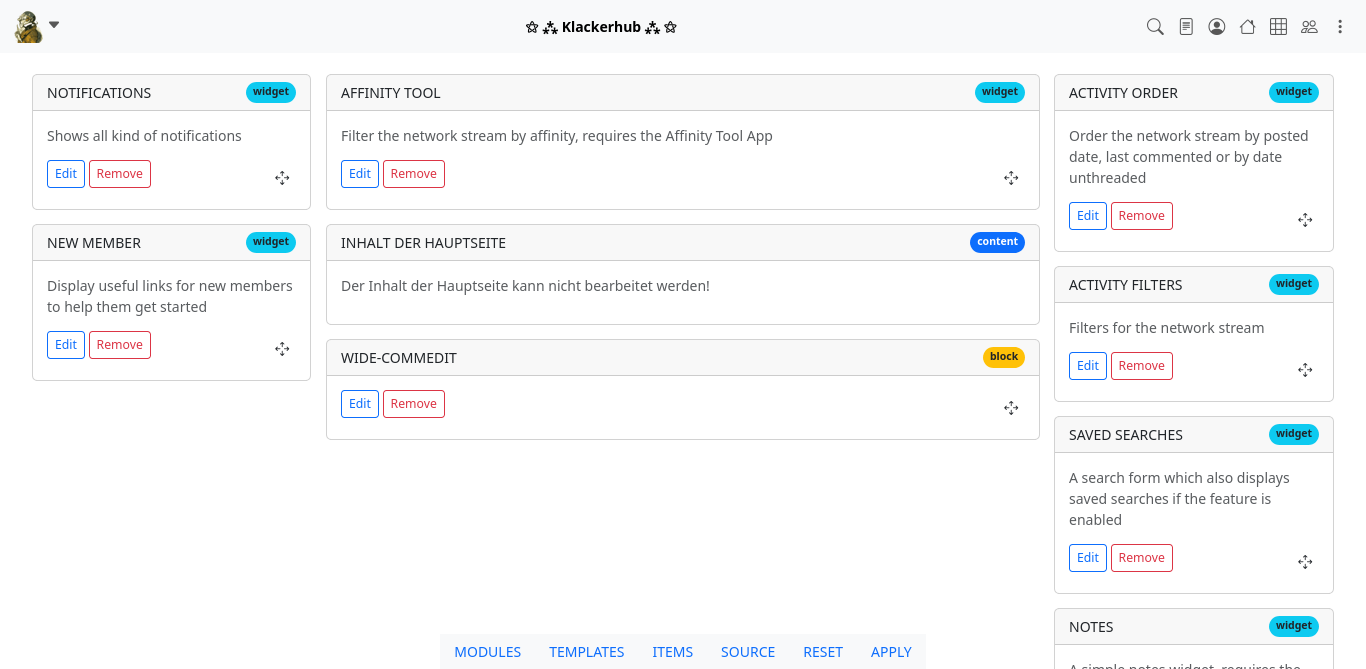
(Nicht vergessen, die Änderung mit Klick auf “APPLY” dauerhaft zu speichern.)
Nun wird der Kommentar-Editor deutlich breiter dargestellt.
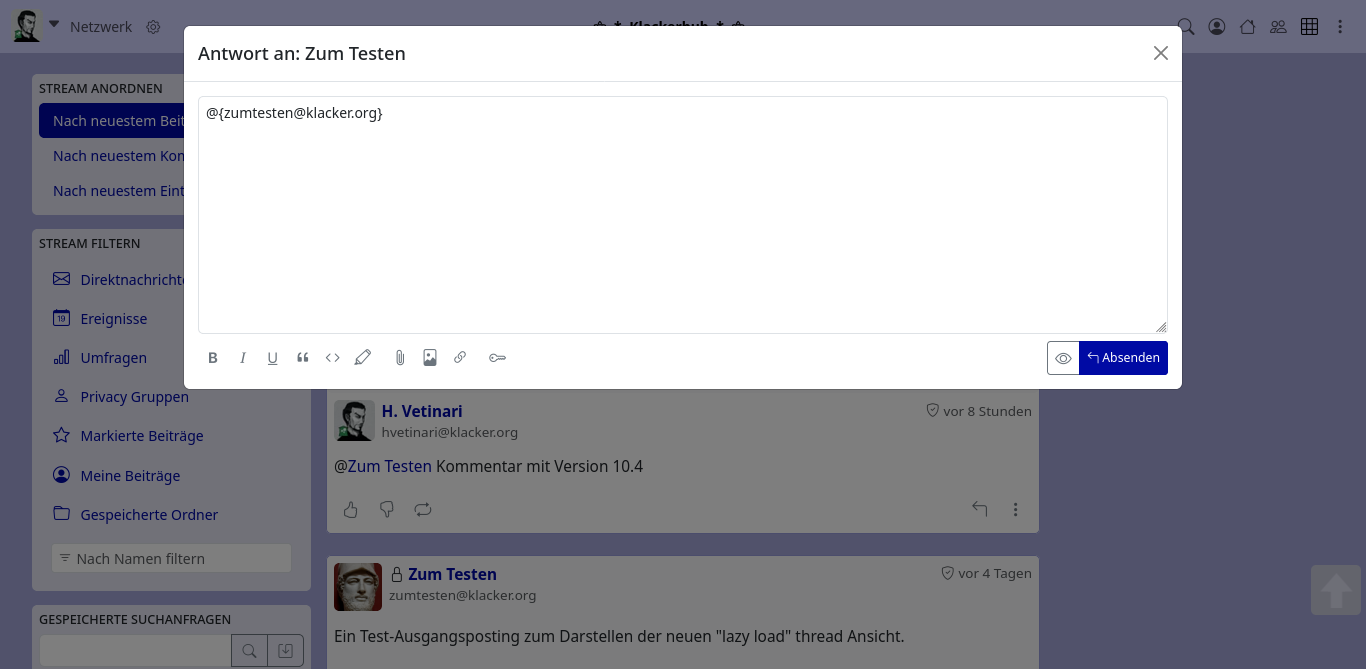
Q: The new comment editor appears very narrow as an overlay. The width cannot be changed. How can I increase the width?
A: There is a great solution that Chris has posted in the support forum:
The channel must have permission to execute code. This must be enabled by the hub administrator.
<style>
@media (min-width: 576px) {
.modal {
--bs-modal-width: 1000px !important;
}
.comment-edit-text.expanded {
height: 17rem;
}
}
</style>
This block (ITEM) is now inserted with the PDL editor in the MODULE ‘network’ at any position in the content area.
(Don’t forget to save the change permanently by clicking on ‘APPLY’.)
The comment editor will now be displayed much wider.
Wer ist an der Konversation beteiligt? - Who is involved in the conversation?
F: Wenn ich eine Konversation mit beschränktem Teilnehmerkreis beginne und dies nicht mittels “@!”-Erwähnung mache, sondern über die Berechtigungseinstellungen im Beitragseditor (kleines Vorhangschloss neben dem Button “Absenden”), wie kann ich dann im Nachhinein schauen, wer alles an der Konversation beteiligt ist?
A: Nutzt man die Berechtigungseinstellungen, um einen Beitrag nur an bestimmte Kontakte zu versenden, so sieht man im Beitrag selbst nicht, an wen die Nachricht adressiert ist, weil keine Ewrähnungen erzeugt werden. Wer beteiligt ist, kann ich als Thread-Starter aber dennoch nachauen. Neben dem eigenen Avatarbild im Header des Beitrags wird im Fall eingeschränkter Konversationen ein Symbol angezeigt: entweder ein geschlossenes Vorhangschloss, oder ein Briefumschlag.
Klickt man auf dieses Symbol, so wird angezeigt, welche Verbindungen an der Konversation beteiligt sind.
Hinweis: Wählt man in den Berechtigungseinstellungen als Adressat eine Privacy Gruppe, so wird neben dem eigenen Avatar das Vorhangschloss angezeigt. Bei Klick wird lediglich aufgeführt, welche Privacy Gruppe an der Konversation beteiligt ist (kein Problem, man weiß selbst ja, wer in der Gruppe ist). Wählt man hingegen in den Berechtigungseinstellungen unter “Fortgeschritten ➔ Benutzerdefinierte Auswahl” einen oder mehrere Teilnehmer einzeln aus, wird das Briefumschlag-Symbol angezeigt und bei Klick werden die Kontakte einzeln aufgelistet.
Q: If I start a conversation with a limited group of participants and do not use the ‘@!’ mention, but instead use the permission settings in the post editor (small padlock next to the ‘Send’ button), how can I see who is involved in the conversation afterwards?
A: If you use the permission settings to send a post only to certain contacts, you will not see who the message is addressed to in the post itself because no mentions are generated. However, as the thread starter, I can still see who is involved. In addition to your own avatar image in the header of the post, a symbol is displayed in the case of restricted conversations: either a closed padlock or an envelope.
Clicking on this symbol shows which connections are involved in the conversation.
Note: If you select a privacy group as the recipient in the permission settings, the padlock icon will be displayed next to your avatar. Clicking on it simply lists which privacy group is involved in the conversation (no problem, you know who is in the group yourself). If, on the other hand, you select one or more participants individually in the permission settings under ‘Advanced ➔ Custom selection’, the envelope icon is displayed and clicking on it lists the contacts individually.


